Wednesday, October 10, 2012

RAW Natural Born Artists Holiday RAWk and a Free Necklace from Release Me Creations


This is going to be an AMAZING event filled with uber-talented fashion designers, music artists, painters, sculptors, film makers, jewelry artists, and more!  Come out to see the incredible talent, and support your indie arts community.

WHERE: The Texas Theatre
231 West Jefferson Blvd
Dallas, TX 75208

WHEN: Thursday, December 6th
8pm-Midnight

HOW: To purchase your ticket, CLICK HERE

In order to receive your free necklace you must purchase your ticket through my RAW ARTIST PAGE.  I will receive a list of all names for all tickets purchased in support of Release Me Creations.  You can either pick up your necklace of choice at the event, or I can ship it to you totally free!  Thank you again for all of your support!

Here are just a few of the possible designs you can choose from.  
You can see the rest on the Release Me Creations Website.


MyFreeCopyright.com Registered & Protected

Saturday, September 8, 2012

Top 10 Future DIY Home Improvement Project List

I love lists. They make me feel more in control of my life. There is something comforting to me to see the list of things I want to do, and will hopefully do.
So today I'm making my Top 10 Future DIY Home Improvement Project List. These things might not get done this year, or next year, or the next five years. But I've got time :)

1) Purchase Hardwood Flooring for Kitchen, Living Room, Master Bedroom and Master Closet (putting this money up is a task in itself)
I love this Handscraped look...we might go a bit darker than this, but with a Great Dane, this will definitely be handscraped/distressed:
Image Credit

2) Install Hardwood Flooring myself...this includes pulling up the hardwood (now ruined) old glued down wood in the kitchen
3) Finish Half Bath (includes installing Pedestal Sink)  I LOVE this one!

4) Make Cushion Covers for Dining Room Chairs, and the Breakfast Nook Cushion
I'm currently digging these colors & designs.  I might add a pop of yellow, or just leave it gray and white:

5) Decorate Guest Bedrooms...perhaps add some paint and wall art

6) Re-do Guest Bath...perhaps some faux granite on the countertop?

7) Re-Do Laundry Room (make it a happy place, with stencilled walls and tile floor)
Here are a few inspirations:


8) Add accent wall to bedroom...I think I want to use a textured wallpaper like these from Graham and Brown:
 

9) Install Wood Blinds (purchase first...that's another expensive venture)

10) New Entryway door (not attempting to install this one on my own...this will be left to a professional)

WHEW!
I have a lot of projects. But like I said, there's comfort in seeing them listed and knowing that there's no rush to get these done. I'm almost kind of excited about it.
So stay tuned to see as these all unfold (slowly)  :)


MyFreeCopyright.com Registered & Protected

Thursday, September 6, 2012

Pretty Little Liars Jewelry

Take a look at the jewelry that is on its way to the stylist of the show Pretty Little Liars!
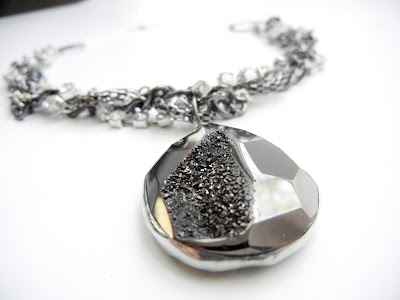
I chose the darker, more glamorous necklace. I thought that it might fit the mood, and some of the characters better. I hope the stylist agrees! If they love it, you might see one of the characters wearing this necklace on an upcoming episode.
I am calling it
"Darkness Falls"
The stone is a faceted Black Titanium Druzy Agate.  
I braided the chain using silver, gunmetal, and rhinestone chains of varying sizes and shapes to create a dramatic effect.  The extension chain has a single faceted Swarovski Comet Argent Light Crystal dangling from it.
Here are a few more views:


What do you all think?  I was definitely torn between this one and the green and gold necklace.  I guess I'll find out if it was the right decision.
Can you see a character wearing this?

And once again, I owe my gratitude and appreciate for The Artisan Group for affording me these incredible opportunities for Release Me Creations.

MyFreeCopyright.com Registered & Protected

Thursday, August 30, 2012

Pretty Little Liars Jewelry Options


I need your help and opinions!
I have narrowed down the jewelry that I will be sending to the stylist of the hit show Pretty Little Liars. If they love it, you will see my jewelry being worn by one of the gorgeous characters on the show!

So, I have narrowed it down to two styles:

The first is darker, with some drama and glam. The pendant is a faceted black brown Titanium Druzy Gemstone, and it hangs from a braided mixture of chains, including tiny square rhinestones, gunmetal curb, and a delicate silver cable chain.
Here's a few close-ups:


The second is a more bohemian necklace. It's a seafoam green geometric glass pendant contrasting against a light gold chain that hangs in the rosary fashion.  I'm thinking of adding some sort of gold connector at the point where they meet, but right now I'm just in the deciding stages of if this is what I want.

I love them both, but am leaning toward the darker more dramatic necklace.  My one concern is how the stone will look on camera. My hope is that the lights will dance off of the facets, as well as the crystals that revealed within the stone, so that it doesn't just look like a black blob. I know the blue and gold necklace will really pop with the light gold, and the contrasting blue. I just cannot decide which one!

What are your thoughts?

MyFreeCopyright.com Registered & Protected

Wednesday, August 22, 2012

Kitchen Wainscoting, Plus Some New Paint and Curtains

The kitchen is on its way to being finished! YIPPEE!
I finished the Wainscoting on the breakfast bar, and then also added a new coat of white paint completing my white kitchen. 
Then I added some new curtains to the breakfast nook and a new shelf. It's transforming before my eyes!
All I have left is a chair rail and some Beadboard Wallpaper around the entire kitchen, new tile floors, and maybe a new cushion cover for my DIY Breakfast Nook cushions.

Okay, first things first. Kitchen Breakfast Bar Wainscoting:
What I used:
Level
Hammer
Tape Measure
Pencil
Square Ruler
1"x1/8" trim molding
8'x4' fiberboard panels
Liquid Nails
Finishing Nails
awl
Paintable Caulk
Latex Paint & Primer in One

Here is is in progress-
The first thing I had to do was measure the entire length and height of the area I was covering. I had to make sure that my boxes were evenly spaced across as well as vertically. This was a bit of a trial and error ON PAPER. I was happy I didn't just slap it up, because even with all of my measuring I found that I had more space on the right then the left when finished.

After coming up with my measurements, I went with 12" square boxes with 3" inbetween, I put up the fiberboard. I had to do cuts with that as well, and I just used a large handsaw. Put the Liquid Nails on the back, and then slapped it up. I used finishing nails in each corner and a few elsewhere on the board where it felt like it wasn't laying flat.

I penciled in the outline of the molding before glueing them up, measuring and remeasuring and checking for level over and over.
I ran into an issue, one I think that is pretty common in all houses, in that the breakfast bar is not completely level, nor is it square to the wall and the floor.  I had to make a decision to measure and have the boxes exactly evenly spaced and not in line with one another, or not.  I chose to have them all on the same line.  What I then had to do was adjust the measurements on the bottom pieces.  They actually progressively became a little bit larger across the breakfast bar.  But in the end, it's not noticeable at all.
 
Here's the first coat of paint-
 
AND FINISHED!

Here's the new shelf...thank you Hobby Lobby 50% off! It's covering up two old outlets, a telephone jack and a cable jack.

Then I added a sheer curtain over the sink:

And new Crushed Ombre curtains in the breakfast nook:


And here's the new textured border, unfinished.  I just added a white wash coat to it to make the design pop and to lighten up the gray a little bit. I'll have finished pics soon :)

Next on the agenda: Add a chair rail and some beadborad wallpaper, finish the half bath, then either tiling the kitchen floor, or install wood floors!  Whohoo!


DIY ClubI Heart Nap TimeIhookedupwithHoHlamespicePhotobucket


MyFreeCopyright.com Registered & Protected
back to top